Figure 1
S
OLDERING TIPSby: Tom Hammond, NØSS
Good equipment and a good soldering technique are both essential to successful assembly of any device. Please read these tips before you start.
1. Temperature-controlled soldering station with a fine tip for use with printed circuit boards. Ordinary (non-temperature-controlled) soldering irons will often produce very poor results when soldering or desoldering components, especially when working with double-side printed circuit boards. They simply cannot provide (and maintain) enough heat when soldering to large foil areas or when several joints are soldered in rapid succession.
Tip width will normally be in the range of 1/32" (0.79mm) through 1/8" (3.2mm), depending upon the width of the pad to which you are soldering. The width of the tip selected should be about 75% to 90% of the width of the pad.
If the heat range of the tip is specified by temperature, choose those with a 600 °F to 700 °F (315 °C to 370 °C) rating.
Though some applications may require the use of a 'conical' pointed tip, a 'screwdriver' or 'chisel' style tip is generally preferable because it offers more contact (heating) surface against the joint.
2. The right solder. Mildly active rosin-core, 0.020" (0.5mm) to 0.035" (0.98mm) diameter solders with 63/37 or 60/40 Tin-Lead (Sn-Pb) content will work best. Small-diameter solder (.020") is preferable when working with double-sided PC boards with plated-thru holes because it allows easy regulation of the amount of solder you apply to each connection.
Silver-content solder (generally 2%) may sometimes be specified. While silver-content solders 'flow' more smoothly and make a stronger joint, they also require more heat and are more difficult to remove when de-soldering a joint, for component replacement. More heat means a better chance of damaging a PC board trace by 'lifting' the pad because the adhesive used to attach the pad to the PC board material has been overheated. Use silver-content solders only when required to do so.
3. A damp sponge (or a kitchen 'curly' metal pot scrubber). Always keep the tip of your soldering iron clean. If using a damp sponge, wipe the tip quickly, so as not to cool the tip excessively. If you use a 'curly', stainless steel, pot scrubber (available in the 'kitchen wares' section of any grocery store), to clean the tip of your soldering iron, no moisture is involved and the thermal mass of the pot scrubber is negligible, so virtually no heat is lost during the tip cleaning process.
4. Small, sharp, wire cutters, either of the diagonal or flush-cutting (preferable) type.
5. Small-tipped needle-nose pliers.
Also useful: Medical hemostats with locking handles.
A WORD ABOUT KEEPING THE TIP OF YOUR SOLDERING IRON CLEAN
The name of the game in soldering is "heat transfer". If you cannot quickly and adequately heat the joint to be soldered, you risk making a poorly soldered connection, and you risk damaging the PC board itself as well. It is essential to keep the tip of your soldering iron clean and well-tinned at all times. Ensure that the tip of your iron is clean before you attempt to apply solder to a connection. Once the tip is cleaned of any debris (burnt rosin, excess solder, tiny bits of component lead, etc.), ensure that the tip is well tinned. If the tip is a dull gray color (instead of a bright silver), apply a tiny bit of solder to 'wet' the tip before you place the tip against the joint to be soldered. Heat transfers from the tip to the joint by physical contact. A clean, solder-wetted tip will significantly decrease the length of time spent on each connection because it enhances heat transfer, even before additional solder is applied. In some instances, it may mean the difference between success and failure in completing a solid connection.
POSITIONING
COMPONENTS ON THE BOARD
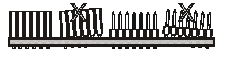
| With the exception of some transistors (e.g. TO-92), unless otherwise specified, all components should be pressed down flush with the surface of the PC board as far as they will go. Figures 1 & 2 show both the right and wrong (X) ways to mount individual components and sockets. | Figure 1 |
When installing ICs and sockets, solder only one lead. Check the positioning of the device (reheat the joint and re-seat the device if necessary) and then proceed to solder the remaining pins once you are satisfied that the device is properly seated against the PC board. Before a wire-lead component is inserted into the PC board, component leads should be formed, using your fingers or long-nose pliers, to fit into the PC board holes.

Figure 2
It is generally accepted as "good technique" to install components in all the same direction (horizontally or vertically) if at all possible. This is done so that all 'readable' nomenclature (text or resistor bands) can be read by holding the PC board in either the normal (front-facing) or the 90-degree rotated position. For instance, with the PC board oriented so the front edge of the board is facing you, all horizontally-mounted resistors should have their bands oriented so they are readable from left to right, and the text for all other non-position-critical components (small caps, etc.) is readable as well. Components mounted with their leads running front-to-back are generally mounted so they are readable when the PC board is rotated 90 degrees counter clockwise.
CLEANING AND TINNING HEAT-STRIPPABLE ENAMELED LEADS
Many enamel-insulated copper wires use a 'heat-strippable' enamel. You can usually identify this type of wire by its color. Most NON-heat-strippable enamels are of a dark color (often a brownish-red), while most heat-strippable enamels are of a much lighter, translucent color (generally red, green, or an orange-yellow).
Measure and clip the lead to a length slightly longer than that required by the joint. Using a HOT (725 °F / 385 °C, or hotter) soldering iron with a medium width (.05" / 1.25mm) tip, melt a 'blob' of solder onto the tip of the iron.
Insert the clipped end of the wire into the solder blob and wait a few seconds for the heat-strippable enamel to begin to smoke and bubble.
As the enamel begins to bubble, insert more of the wire into the solder blob. Adding a bit more solder to the new rosin will assist in the tinning process.
Once you have inserted and stripped the lead to the length required, slowly pull the wire back out of the solder blob. This should produce a nicely tinned lead with possibly a bit of burnt rosin remaining on the outside of the tinned lead. Any remaining rosin can be easily removed by pulling the wire between your index finger and your thumbnail.
CLEANING AND TINNING NON-HEAT-STRIPPABLE ENAMELED LEADS
Leads which are insulated with enamel (e.g. Formvar) which us not heat-strippable must be scraped clean before they can be tinned.
WARNING: When using a knife (or other device with a sharp blade) to strip enamel from a wire, be very careful to not cut or nick the wire itself. A wire which has been nicked will not withstand much flexing at the nick before it breaks.
Determine the length of the lead which must be stripped. Lay the lead on a hard surface and, using a sharp blade held vertically and placed at the inner end of the length to be stripped, slide the blade toward the end of the wire. Rotate the wire slightly and repeat until all of the enamel has been removed from the end of the wire.
Once the enamel has been stripped of enamel, heat the lead
with your soldering iron and apply a light coating of solder.
| SOLDERING
Proper positioning of the soldering iron tip and solder are essential in obtaining a well-made soldered joint. (Figure 3) The tip must be in contact with both the lead to be soldered and the PC board pad. |
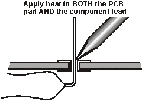 Figure 3 |
| The soldering iron will heat the lead and pad, and their combined heat will then melt the solder. This ensures a well-made, solid joint. (Figures 4 & 5) | 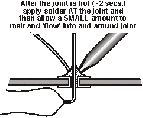
Figure 4 |
 Figure 5 |
| Figure 6 shows a well-made connection to a single-sided PC board. A small amount of solder has been melted by the heat from the component lead and the PC board pad. A small additional amount of solder has been added to the joint to form a small rising fillet around the lead. | 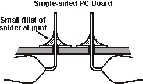 Figure 6 |
| If the PC board was of the plated-thru hole type, capillary action of the lead in the plated-through hole has drawn the solder down into the hole.(Figure 7 left) |
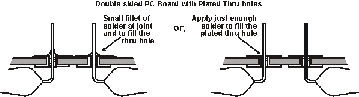 |
Figure 7
Note that some soldering requirements may dictate that no fillet be created when soldering to plated-thru holes. (Figure 7 right) In this instance, apply only enough solder to fill the plated-thru hole. Use of .020" diameter solder greatly enhances your ability to perform this operation. Use of .03" or larger diameter solders will generally cause more solder than required to be applied the instant the solder is applied to the joint.
When soldering plated-thru holed which are to only be filled, apply a small amount of solder and allow your iron to remain a short while longer. This will ensure that the solder is 'wicked' down into the hole. You will be able to see the solder as it flows into the hole.
| Figure 8 illustrates two adjacent, but separate, connections which have been shorted together by the application of excessive solder. | 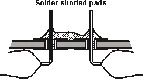 Figure 8 |
| Figures 9 & 10 show what can happen if the component lead is not heated along with the PC board pad. A rosin joint will result. The solder flows onto the PC board pad, but since the component lead is not hot enough to melt solder, rosin accumulates around the wire. The solder then forms around the rosin coating on the component lead, and there is no connection. Generally, joints of this type can be corrected by reheating the joint. |  Figure 9 |
 Figure 10 |
Similarly, a poor joint will result if you do not properly strip and tin the enameled wire leads of inductors before the lead is inserted into the PC board for soldering. Enamel coating allowed to remain on the inductor lead can create a joint similar to the rosin joint, preventing the lead from being adequately heated by the soldering iron. Such a joint cannot normally be restored by reheating. Remove the lead from the PC board, strip it of all enamel and tin it. Then resolder the joint.
| Commonly-used diagonal cutters have blades which
are beveled to an edge from both sides. The cutting action of such a blade can flare, or
mound-up, the soldered joint (Figure 11, left). In contrast, the blade of a flush cutting wire cutter (Figure 11,right) is flat on its bottom and beveled only from the top. Flush-cut connections will be flat across the surface of the cut, making them cleaner and less likely to cause shorts to nearby pads. Clip leads just slightly above the surface of the PC board (1/16", 1.5mm). This will leave enough excess lead length to facilitate reheating the connection if it is necessary to remove the component, and to reinstall it later, if required. |
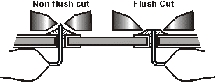 Figure 11 |
| To determine if you are using too much solder, look at your connections once the excess lead length has been trimmed from the component. As shown in Figures 12 & 13, if your wire cutters have cut too deeply into the solder, there is probably too much solder being applied. | 
 Figure 12 Figure 13 |
| Adjacent components may become accidentally shorted together when their leads are clipped following soldering. Examples of this are shown in Figures 14 & 15. A lead from the resistor has first been folded flat against the PC board. Then, when it was clipped, it was not clipped close enough to the joint, and was allowed to lie up against the lead of the nearby capacitor. | 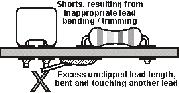
 Figure 14 Figure 15 |
"What brand/type/diameter solder should I use for building my Elecraft Kits?"
We've all probably thought it to ourselves, and we've certainly seen it in print here on the Elecraft Reflector...
This question appears almost weekly on the Elecraft Reflector, and Elecraft Chief Tech, Gary Surrency (AB7MY) admits that he hears it almost every DAY.
In an effort to help answer the question and reduce concern by users, I have been asked by Elecraft to compile a document which, it is hoped, hoped you will refer to the following data when making your solder selection.
If you only want to know what solders to buy, you may jump right past the next section and go right to the 'meat' of the subject, to the section titled "ELECRAFT-RECOMMENDED SOLDERS". Also, BE SURE to read the section regarding what types of solder to NOT use!
RESIN
A solid or semi-solid organic compound lacking a crystalline structure. Resins are characterized by not having definite and sharp meting points, are usually not conductors of electricity, and many are transparent or translucent. Natural resins usually originate in plants, such as pine sap, and are not water soluble. The rosin used in soldering fluxes is an example of a resin. Also used to describe fluxes based on synthetic resin rather than rosin.
ROSIN
A naturally occurring resin usually associated a component of pine sap. It is a mixture of several organic acids, of which abietic acid is the chief component. Available as gum, wood and Tall Oil Rosins, sometimes chemically modified. The most widely used material in the manufacture of soldering fluxes for the electronics industry is water white (ww) gum rosin.
R = Identity code for a flux which contains rosin without additional activators.
RA = Identity code for a flux which contains rosin with additional activators to enable soldering of difficult substrates. Although an RA-based material, the residues are not-corrosive if left uncleaned.
RMA = Identity code for a mildly activated rosin flux as used for much electronics work. Although an RA-based material, the residues are not-corrosive if left uncleaned. RA fluxed solders seem to be gaining more favor, especially in the military, as the more appropriate solders to use in electronic work.
Solder Wire = Solder available in small wire gauges, as opposed to BAR solders.
Silver-Bearing Solder = A solder alloy which normally contains 2% silver along with 62% Tin and 36% Lead. While this type of solder WAS originally recommended by Elecraft, it has been determined that kits assembled with this type of solder can be more difficult to repair due to the higher melting point of the solder. As a result, there is an increased risk of lifting a PC board land while attempting to desolder or re-heat a plated-thru connection.
PLEASE NOTE: Elecraft no longer recommends using silver-bearing solder. However, rigs submitted for repair which were assembled using silver-bearing solder WILL be serviced without question.
This list is NOT exhaustive. However these brands and fluxes HAVE been tested and have been found to be acceptable. There are most certainly other brands, with equally acceptable flux cores also available.
The following brands and types of solder are RECOMMENDED for use
when building Elecraft kits. Below this section, I have included a listing of available
solders from both Mouser and Digi-Key, just to give you at least two possible sources.
Kester
RA (Activated Rosin) Type Flux Core types "44", and "285", 60/40 or 63/37 Sn/Pb content in diameters between 0.020" (0.5mm) and 0.035" (0.89mm), with 0.020" to 0.030" being the preferred sizes.
Multicore (previously Ersin-Multicore)
RA (Activated Rosin) Type Flux Core
| Multicore Part # |
Content Sn/Pb |
Diameter | Spool Weight |
| MM00979 | 63/37 | 0.022" (0.56mm) | 1 lb (0.5kg) |
| MM00980 | 63/37 | 0.024" (0.61mm) | 1 lb (0.5kg) |
| MM00981 | 63/37 | 0.032" (0.81mm) | 1 lb (0.5kg) |
| MM00992 | 60/40 | 0.024" (0.61mm) | 1 lb (0.5kg) |
| MM00993 | 60/40 | 0.032" (0.81mm) | 1 lb (0.5kg) |
| MM01020 | 60/40 | 0.022" (0.56mm) | 1/2 lb (0.25kg) |
| MM01021 | 60/40 | 0.022" (0.56mm) | 1 lb (0.5kg) |
| MM01022 | 60/40 | 0.024" (0.61mm) | 1/2 lb (0.25kg) |
| MM01023 | 60/40 | 0.024" (0.61mm) | 1 b (0.5kg) |
| MM01083 | 63/37 | 0.022" (0.56mm) | 1/2 lb (0.25kg) |
| MM01084 | 63/37 | 0.024" (0.61mm) | 1/2 lb (0.25kg) |
RMA (Mildly Activated Rosin) Type Flux
| Multicore Part # |
Content Sn/Pb |
Diameter | Spool Weight |
| MM01045 | 63/37 | 0.032" (0.81mm) | 1 lb (0.5kg) |
Radio Shack Rosin Core Solders
| Multicore Part # |
Content Sn/Pb |
Diameter | Spool Weight |
| 64-017 | 60/40 | 0.032" (0.81mm) | 0.5 oz (14g) |
| 64-005 | 60/40 | 0.032" (0.81mm) | 2.5 oz (71g) |
| 64-009 | 60/40 | 0.032" (0.81mm) | 8.0 oz (0.25kg) |
W A R N I N G W A R N I N G W A R N I N G
DO NOT build ELECRAFT kits using solders which contain NO-CLEAN or WATER-SOLUBLE FLUXES, nor should you use NO-LEAD solders!
Kits submitted for repair which HAVE been assembled using No-Clean or Water-Soluble fluxes MAY be refused service..!
- DO NOT USE SOLDERS WITH THE FOLLOWING TYPES OF FLUX CORE -
Kester "245" No-Clean Solder
Kester "331" Water-Soluble Solder
or ANY solder with a "No-Clean" or "Water-Soluble" flux core.
If you have ANY questions about which solder is appropriate
to use PLEASE ASK ELECRAFT BEFORE YOU USE IT.
POSSIBLE SOLDER SOURCES (not
exhaustive)
MOUSER ELECTRONICS ( http://www.mouser.com )
KESTER SOLDERS
"44" Rosin, (RA) Activated Rosin Core Solder
| MOUSER STK NO. |
Content Sn/Pn | Diameter (inches) | Spool Weight |
| 533-24-6337-0100 | 63/37 | 0.020" | 1 lb. |
| 533-23-6337-18 | 63/37 | 0.025" | 1/2 lb. |
| 533-24-6337-18 | 63/37 | 0.025" | 1 lb. |
| 533-23-6337-27 | 63/37 | 0.031" | 1/2 lb. |
| 533-24-6337-27 | 63/37 | 0.031" | 1 lb. |
| MOUSER STK NO. |
Content Sn/Pn | Diameter (inches) | Spool Weight |
| 533-24-6040-0100 | 60/40 | 0.020" | 1 lb. |
| 533-23-6040-18 | 60/40 | 0.025" | 1/2 lb. |
| 533-24-6040-18 | 60/40 | 0.025" | 1 lb. |
| 533-23-6040-27 | 60/40 0 | .031" | 1/2 lb. |
| 533-24-6040-27 | 60/40 | 0.031" | 1 lb. |
"285" Rosin, (RMA) Mildly Activated Rosin Core Solder
| MOUSER STK NO. |
Content Sn/Pn | Diameter (inches) | Spool Weight |
| 533-24-6337-9700 | 63/37 | 0.020" | 1 lb. |
| 533-24-6337-9718 | 63/37 | 0.025" | 1 lb. |
| 533-23-6337-9713 | 63/37 | 0.031" | 1 lb. |
| 533-24-6337-9710 | 63/37 | 0.031" | 1 lb. |
DIGI-KEY ( http://www.digikey.com )
MULTICORE SOLDERS
RA (Activated Rosin) Core Solder
| DIGI-KEY STK NO. |
Content Sn/Pn | Diameter (inches) | Spool Weight |
| SN6324-ND | 63/37 | 0.020" | 1 lb. |
| SN6322-ND | 63/37 | 0.025" | 1 lb. |
| SN6321-ND | 63/37 | 0.032" | 1 lb. |
| DIGI-KEY STK NO. |
Content Sn/Pn | Diameter (inches) | Spool Weight |
| SN6022-ND | 60/40 | 0.028" | 1 lb. |
KESTER SOLDERS
"44" Rosin, (RA) Activated Rosin Core Solder
| DIGI-KEY STK NO. |
Content Sn/Pn | Diameter (inches) | Spool Weight |
| KE1103-ND | 63/37 | 0.020" | 1 lb. |
| KE1112-ND | 63/37 | 0.025" | 1/2 lb. |
| KE1109-ND | 63/37 | 0.025" | 1 lb. |
| KE1111-ND | 63/37 | 0.031 | 1/2 lb. |
| KE1102-ND | 63/37 | 0.031" | 1 lb. |
| DIGI-KEY STK NO. |
Content Sn/Pn | Diameter (inches) | Spool Weight |
| KE1107-ND | 60/40 | 0.020" | 1 lb. |
| KE1118-ND | 60/40 | 0.025" | 1/2 lb. |
| KE1116-ND | 60/40 | 0.025" | 1 lb. |
| KE1117-ND | 60/40 | 0.031" | 1/2 lb. |
| KE1106-ND | 60/40 | 0.031" | 1 lb. |
"285" Rosin, (RMA) Mildly Activated Rosin Core Solder
| DIGI-KEY STK NO. |
Content Sn/Pn | Diameter (inches) | Spool Weight |
| KE1201-ND | 63/37 | 0.020" | 1 |
| KE1202-ND | 63/37 | 0.025" | 1 |
| KE1200-ND | 63/37 | 0.031" | 1 |
______________________________________________________
NOTE: Neither Tom Hammond nor Elecraft have any interest whatsoever in the Kester, Multicore, Mouser Electronics, or Digi-Key companies.
Compiled for Elecraft, 02/28/2001, by Tom Hammond